Posted on Leave a comment

Pruning your Raspberry & Blackberry Bushes

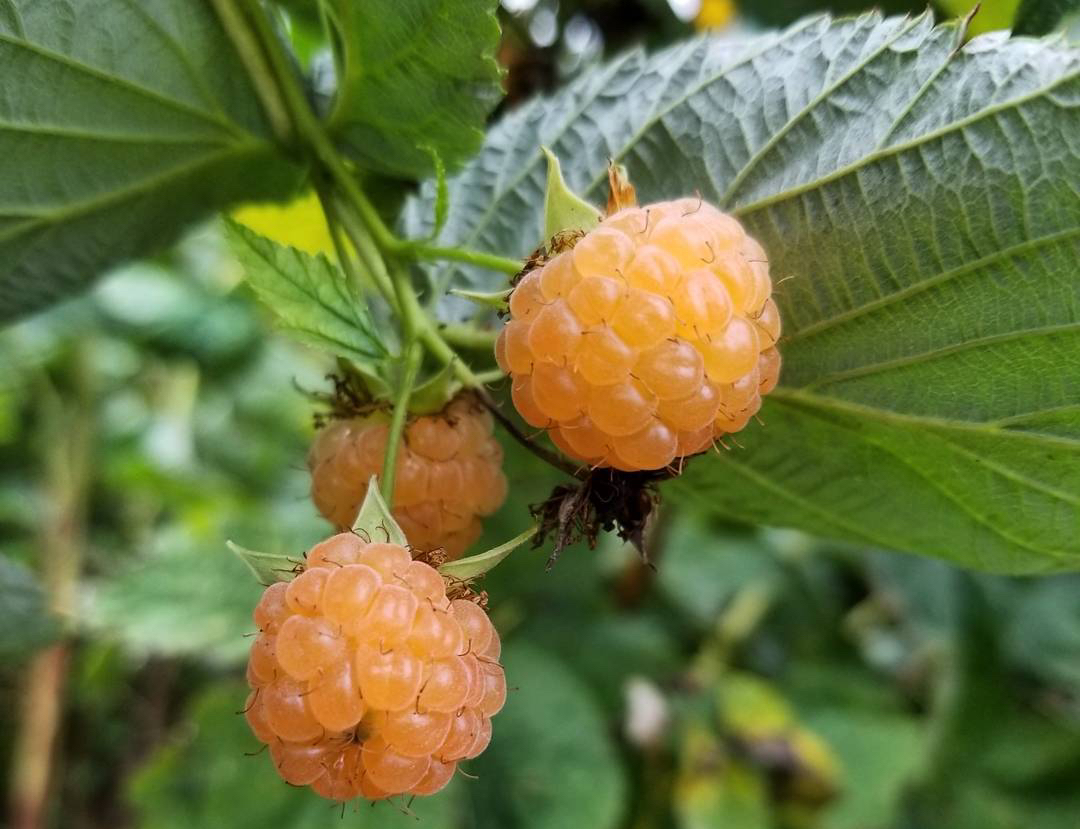
ripe golden raspberries

Pruning your Raspberry & Blackberry bushes is an essential & necessary task that you should complete in late winter to ensure the health of your plants, promote growth, and to optimize fruit production. You want to wait until late winter to prune your plants because the canes actually provide carbohydrates to the root system of the plants, helping the plants to better survive the harsh winter.

IMG_20171223_105639_340.jpg

So why should I prune my berry plants?

Pruning will keep your raspberry or blackberry patch from becoming overcrowded. You may think that an abundance of canes means an abundant amount of fruit, but it’s all about knowing the growth habits.

You want to keep last year’s canes that didn’t bear fruit. Those primocanes will then become floricanes – meaning they will flower & bear fruit this year.

Using loppers or hand pruners, remove any dead-looking canes and get rid of small/spindly canes as well, by cutting them at the ground level. You can also get this tutorial on my YouTube channel to see the pruning in action – here’s a link to the video.

Thin the canes so they’re about 6 inches apart & trim your rows so that they are 1.5-2 feet wide.

As far as pruning the actual canes, you’ll want to top them around 36 inches in height. This will encourage new lateral growth – which then turns to flowers – which then turns to fruit!

A lot of reading that I did also said you wanted to remove any canes that fruited in the past season. I didn’t have to worry about that with my Boyne Raspberry plants because it was only their first year growing, but the Anne Raspberry had a ton a fruit! Since those canes were not deadwood I just pruned the top of the plant that had flowered – I guess we’ll see what happens!

When you prune raspberries, you need to prune them to a flowering node (see below).

IMG_20180103_062223_349.jpg

Pruning blackberries is very similar to pruning raspberries – they’re both in the Bramble family, which includes roses as well! However, the growth habit of blackberries is slightly different.

Blackberries grow a lot like grapes – they have vines & grow up to 20 feet long! You want to keep blackberries pruned to having 5-7 vines per plant. Tip each vine at about 3 feet. Each vine will then have lateral branches – prune these to about 10-12 inches. This will promote rapid growth – and I wish I brushed up on this knowledge before I butchered my blackberry plant 😭 you can see the video here!

As I mentioned, last summer was the first time I was able to harvest raspberries from the Anne golden raspberry plant I started in the summer of 2016. The amount of fruit that we harvest was astounding!

golden raspberries
Anne Golden Raspberries

I didn’t even prune the canes from one year to the next, they got hit with a freeze after the growth cycle began in early spring, and the only “trellising” that I did was wrapping some sisal twine around the middle of the canes. Basically it was a raspberry ponytail 😂

This trellising system was apparently effective, but I just wonder how much better it will be with a legitimate trellis! In case you’re wondering what that might look like – it typically consists of wooden posts with cross-bars at 24″ height & 36″ height. Wires are then run from post to post & this provides a framework for the raspberries to grow upon.

The importance of the trellis is really 2-fold:

  1. To support the canes & to optimize fruit production.
  2. To open the canopy & allow for newly sprouted primocanes to flourish.

Trellising is important, but pruning is the real catalyst for fruit production & new growth to happen. Now that the pruning is done we will be waiting for the ground to thaw out so that we can install the trellis system – stay tuned for the blog & the video that will give you a step-by-step on how to make it happen!

If you have any further questions, drop me a line below – would love to hear from you!

Posted on 1 Comment

How to Grow Orchids

Orchids are a perfect plant for your home or office because they don’t need a lot of light, water, or nutrients – just someone who knows how to deal with their delicate nature!

Okay, so orchids aren’t that delicate, but you have to know a few things about these unusual & beautiful epiphytes!

What is an Epiphyte? Epiphytes are plants that grow on other plants, but they are not parasitic. Plants in this group include air plants & orchids as well as some ferns and bromeliads.

Light – needs sufficient light. Leaves should be lighter green, almost yellowish tint – should not be dark green. Dark green foliage is an indication that your orchids are not getting enough light.

Air – select a growing site that has some air movement that mimics an orchid’s natural environment.

Media – orchids are epiphytes – that is the botanical term for “air plant”. This means that orchids don’t need soil to grow, but they grow on other plants or objects for physical support, they are not parasitic.

Water – watering orchids weekly should be enough to keep them healthy. Allow the media to dry out between watering – this will keep the orchid watered, while preventing fungus or disease to develop.

Fertilizer – orchids aren’t heavy feeders, so you won’t have to fertilize as often as you would other plants, like tomatoes, which are heavy feeders. When applying fertilizer, choose a balanced 20-20-20 or similar blend that contains NO urea. The reason for this is that orchids are not grown in soil with the soil-borne organisms necessary to breakdown the urea into a usable form (if you have media with mycorrhizae, you may be okay).

Those are the basics of orchid care – they aren’t delicate, they just need some love from someone who can deal with their strange growing habits and understand their needs. Overall, orchids are fairly low-maintenance, but there will be a time you may need to prune a flower stalk, or you may need to repot an orchid from time to time. Check out my other articles on those topics below – or watch my latest Plant Rant to see how it’s done!

How to Prune Orchids

How to Repot Orchids

← Back

Thank you for your response. ✨

Posted on Leave a comment

How to Repot Orchids

The first thing you may want to do is check out “How to Prune Orchids” to make sure your plant is ready to be repotted. You can repot your orchids if they have flowers on them, but there is a greater chance of damaging those flowers or stressing the plant out.

A lot of orchids are potted in clear pots, so that makes it much easier to see when they need repotted.

So when do orchids need repotted?

Check out the plants roots – what color are they?

If they’re green & growing uninhibited, then leave it be.

But if you notice that the roots are starting to circle, then you should repot it. If the roots are brown, then you need to repot it.

So how do I repot my orchid?

  1. With one hand holding the pot, put your other hand around the foliage, ready to tip the pot over.
  2. Tip the pot over, dumping the root system out & catching the plant in your hand.
  3. Begin to “tease” the roots out. They may be bound up in the bottom of the pot, or may have grown to fit the pot. Don’t be afraid to pull the media from the roots – you may even remove some dead roots in the process.
  4. Remove dead roots. If the roots are brown, you may be able to strip the root covering – called velamen – away from the roots, leaving an uncovered root that may still help the plant uptake water & nutrients.
  5. Be gentle, but don’t be afraid to hurt the plant. Cutting away dead or decaying roots will aid in the growth process in the long-term.
  6. Once you get the roots tidied up, it’s time to repot. If it will fit, you can reuse the original pot, but you may want to shift your plant up to a larger pot to accommodate new root growth.
  7. Place the roots inside the pot & begin filling the pot with a well-draining media mix. You can either get a media specifically for orchids, but if you can’t find any, a bark mix would be a great substitute.

Hopefully this helps you on your Orchid-growing journey! For a full care guide, check out the Orchid Growing Guide & check out my YouTube series about growing & caring for Orchids!


Posted on 2 Comments

How to Prune Orchids

Now that your Orchids have dropped their flowers, you’re probably wondering, “what did I do wrong?”

This is a natural step in the growing process. The better question to ask is, “what am I supposed to do with this thing now?”

Once your Orchid has dropped its flowers, you have 3 options:

  1. Cut the main stem as close to the base of the plant as possible – This will direct the energy back into the plant & after a few weeks, another flower spike will begin to form.
  2. Cut a centimeter above a plant node – This will encourage the orchid to branch & you could end up with 2-3 branches that will flower.
  3. Leave it alone – I’ve left a spike after the flowers have dropped & have seen it re-bloom 3-5 more times! Depending on how much energy & nutrition the plant has, it could keep regenerating – but if it doesn’t after a few weeks, try option 1 or 2.

Orchids are certainly an unusual & special plant, but with a little knowledge, they can be tamed & easily taken care of.

For more info – check out my blog on How to Grow & Care for Orchids!

And if you find that your plants are blooming, or looking as healthy as they were when you first got them, maybe it is time to let them stretch their legs by repotting them!

Posted on 2 Comments

3 Types of Grow Lights for Seed Starting

leaf growing in a light

Whenever I talk about grow lights, I always get a sideways glance, a suspicious look, or a playful joke – trust me, if I was growing “smelly tomatoes” I definitely wouldn’t be talking about it! 😂

There was a time where grow lights were only used in dank-smelling basements & illicit indoor grow ops, but times have changed!

People want to grow indoors for a number of reasons:

  • Starting seeds
  • Growing plants & food through the winter months
  • Vertical growing

And in order to grow indoors, you’re going to need some light! The 3 most popular types of lights that growers use include:

Fluorescent

Fluorescent lighting used to be the most abundant light source around us (probably still is in some offices!), but most light has been switched to LED due to efficiency, lifespan, and economics.

Your best bet is to go with a High Output T5 light – that will give you the strongest light that you can get from a fluorescent & should be enough to get your seeds rocking & rolling! Here’s how my tomatoes & peppers did under the T5 last year.

These are great lights for seed starting & I also use mine for my abundance of succulents that I have planted in Root Pouches – stop by the shop if you want to help me clear some out 😊 or let me know if you see one in the picture below you like & I’ll get it listed!

20171203_1014551973590563.jpg

HPS (High Pressure Sodium)

I have no experience growing under HPS lights, but almost every grower that I have worked with over the past 5 years that uses grow lights, uses HPS. And when I say grower, I mean vegetable, annual, perennial, trees, shrubs, not cannabis.

These lights were the industry standard for a long time, but there’s another benefit that is overlooked – the heat they emit. Growers in warmer states may not want this, but this is a huge benefit to northern growers like Ohio, Michigan, or Minnesota. LEDs may save you money on energy costs, but how much more do you have to pay for supplemental heat?

This is why there is no one-size-fits-all solution for lighting. As with everything in life – it depends on a lot of factors.

LED (Light Emitting Diode)

LED lighting seems like it is on a whole other level than other lights. There are about 8 million different configurations of LED grow lights out there ranging from a $20 panel on Amazon to a $2000 set-up from a more sophisticated manufacturer. I don’t have experience with the high-end lights, but here’s what a few of those cheap LEDs did for my Habanero seedlings last year.

Screenshot_20180126-074553.jpg

LEDs have a ton of benefits:

  • Uses up to 50% less energy compared to HPS or Fluorescent
  • Can incorporate a wide light spectrum that includes Far-red, Green, and Blue
  • Ability to dial in a “light recipe” – some lights let you select amounts of Red, Blue, etc
  • Don’t give off high amounts of heat like HPS – won’t burn plants
  • Can provide disease suppression

Because there are so many options out there, I decided to go with the TotalGrow Broad Spectrum LED bulbs. The initial cost is higher than fluorescent lights, but the energy usage is 24W versus 11W – plus I’ll get a higher quality of light from the LED & my plants will grow exceptionally well!

Fluorescent lights have an inefficient & less powerful spectrum that causes plants to stretch out a little, but that should be completely mitigated with this new light set up – I can’t wait to see the power of Full Spectrum lighting!

Full Spectrum

What does Full Spectrum mean? Different colored light has differing effects on plants. See the chart below from TotalGrow to see what the Broad Spectrum LEDs do for your plants.

TotalGrow Broad Spectrum LED specs
Credit: Totalgrowlight.com TotalGrow Broad Spectrum LED Light Recipe

I’ll also be posting updates throughout the growing cycle – from Seed Starting to Supplying our customers with their CSA Veggie Box – so stay tuned to see how these lights perform from Seed to Sale!

As always, feel free to comment any questions, concerns, or drop some knowledge on me with anything I’ve missed!

Posted on 6 Comments

How to Grow Mushrooms

It is mid-January & I can’t wait another week to start growing something, so I got some Mushroom Growing kits to grow Portabella & White Button Mushrooms!

Mushrooms are not my favorite food – I really only like them on pizza or steak – and only sometimes! But between Kyla’s family & mine, I know we can find plenty of people that will love them.

My biggest concern with the growing kits I got is that they sat out in sub-zero weather for X amount of hours before I got home to bring the delivery in. You typically want to keep the temperature above 50 degrees to ensure the spores aren’t killed. I’m sure the mail person read the box that said “Magic Mushroom Growing Kit” and didn’t even see the [TEMPERATURE SENSITIVE] sticker on the top.

So with that being said, we began the kits with a little bit of faith that the cold didn’t destroy our potential shroomies!

Here’s what you’ll need:

  • A knife to open the box & rake the mushroom compost.
  • 32-40 ounces of room-temperature water
  • Trowel or Fork

Here’s how you set it up:

  1. Open the box & remove the “Casing”. The casing is peat moss & sand fines that will sit on top of the mushroom compost and help to keep the media moist.
  2. Look at the mushroom compost – you should see white spiderweb-like strings running through it – that is the mycelium, the vegetative part of the fungus. Now take your knife or fork & rake through the top 1/2″ of compost.
  3. After that, add a half-cup of the mushroom compost to the bag of casing & then add 32-40 ounces of water, stirring until you have a muddy-looking mixture. Allow is to sit for 15 minutes & absorb the water.
  4. Once the mixture has sat for 15 minutes, dump the wet casing on top of the mushroom compost creating a top layer. Take care to not compress the media.
  5. Now we wait! Make sure that your boxes are in the temperature range of 55-75 degrees (62-68 is optimal). They do not need direct light to grow & should thrive in a dark, moist environment.
  6. In 1-3 weeks you should see grow & hopefully the first harvest. You should be able to harvest for 6-8 weeks from this kit.

Check back to see our progress with our kits & check out our harvest!

For a more visual aid to growing mushrooms, check out my latest Plant Rant on How to Grow Mushrooms – happy growing!


Posted on 2 Comments

Your Passion is a House Plant

Your Passion is a House Plant.png

Posted on Leave a comment

Documenting the Year of Growing

man climbing rice terraces

As the momentum begins to build into 2018, I’ve decided that I really want to dive into documenting my whole process of growth – both in & out of the garden.

On one hand I have a ton of goals on my plate this year. I have them broken down by category & timeframe. Personal, Work, Fitness, Nutrition, Gardening, Social, Video, Audio, & Photography are my main goals & I have Daily, Weekly, Monthly, & Yearly goals for each category.

It’s a lot, but I’m ready to execute. The time has come & gone where I piddled my time away consuming instead of creating – but it’s even beyond that – I have figured out my place in the cosmos and I have learned how to Be instead of worrying what I was going to Become.

It is pretty apparent that my passion is growing, nurturing, and continually learning in order to overcome the challenges that nature undoubtedly will force upon you. I have talked about my big dreams for the future, but in order for that to happen, we need to execute on the scale we’re at by providing the best CSA Veggie Box Subscription this side of the Great Miami River! 😂

With 10+ people ready to sign up, we have a lot of work ahead of us!

Last year I dismissed the idea of a Veggie Box Subscription because:

  1. Didn’t think I had enough growing space to execute.
  2. Wanted to save veggies for friends, family, ourselves – but we had wayyy too much!
  3. Didn’t want my passion to be tied to someone else’s expectations. I didn’t want to take the fun out of growing. I don’t grow for money, I grow because I love it!

This year I realize that this is the perfect test to see if we can pull this off!

My biggest concerns are:

  1. Not enough space to grow it all. This is a concern, but also a really fun challenge. Here’s your small ass backyard, now grow an abundance of veggies for at least 10 people! We’ll probably grow some lower-maintenance plants like potatoes & corn at my garden plot at my parents’ house. (I’m trying to talk them into letting me plant raspberry bushes along the perimeter of the property, but I don’t think they’re sold yet). Other than growing at other locations, we’ll also utilize interplanting, succession planting, container production & vertical growing systems when possible! (Stay tuned, that bolded section will have to be its own post!)
  2. Not enough production. This is a stupid worry to have, but it’s a real one! Due diligence of monitoring the fertilization and water should be enough to solve this problem though. That coupled with a good disease/pest management program will ensure a bountiful harvest.
  3. Timing. This will be as simple as following the production schedule that I’ve created, but the weather will determine a lot of this. Last year the tomatoes took forever to ripen up due to the high temperatures in July – that could delay ripening by a week or more! The good news is that we’re growing so many different things that it shouldn’t be a problem to fill a veggie void!

It’s only January, but stayed tuned! We have so much stuff Growing on that we’ll keep the Blog & YouTube busy all year long. We are getting ready to start some of the earlier seeds, like onions, within the next week. Not only are we getting the garden ready, but I’ve got some growing tips for Succulents & Orchids on the way – plus we’re getting ready to test out growing White Button & Portabella Mushroom growing kits.

There’s so much growing in my mind & I can’t wait to share it all with the world!


Posted on 8 Comments

My Passion Projects

2017 was an amazing year for me with a lot of execution on creative projects. Typically I’m not much of a creative, or much of a person that shares those things either, but 2018 is the year of speaking my truths & executing further on my dreams.

By dreams, I mean the eventual plan of owning a farm – or to stop the negative looks/thoughts/feelings that everyone has when I say I’m gonna be a farmer – I’m going to be a grower; a field grower, a container grower, a greenhouse grower.

And this is a PLAN – not a pipe dream. Pipe dreams are for wishful thinkers & dreams are for losers – there’s no room for pointless dreams in a world that needs action & execution.

So here’s a quick rundown of my projects & channels!

Gardening 4 Gains –  Garden Blog|Plant Shop|Mission – This is the engine that powers everything that I do! Gardening 4 Gains began as my Instagram handle & is a mix of my 2 biggest passions: bodybuilding & gardening. As my love for gardening grew, I began to do research, watching gardening videos to learn more. One of the biggest gaps I found was the amount of information that needs to be relayed to people about gardening, so I began blogging & have slowly gotten into YouTube – that is one of my top targets for 2018 – to post weekly videos of relevant, interesting, and engaging content to build the Gardening 4 Gains Community & spread the awesomeness of the art of gardening.

Plant Rant Series – YouTube Channel – One of my top goals for 2018 revolves around publishing to YouTube. And not just posting videos, but creating a stream of content that is highly relevant, helpful, and engaging for people curious about learning how to garden. If you’re stepping into the gardening world, leave me a comment with some of your top questions & I’ll be happy to answer!

Writing TV Show Script – Sorry, no link to this guy just yet, and I don’t think I can tell you much about the story until we get it polished & ready for the press! The idea for this show is something that my buddy Tony developed – we actually discussed this a few years back in college, but for some reason, it has just started clicking with us. That’s the thing about a great idea – it doesn’t die! It only becomes stronger in its slumber because it’s a living, breathing, ever-morphing idea in the mind and once we started writing, we rolled! Currently we have 5 episodes written, all between 25-35ish pages – so needless to say, we’ve been crushing it! Now we finish editing, polishing, and then we will be submitting it to multiple companies like Amazon & Netflix – where else should we submit?

Plant Rant Radio – Anchor Podcast – This is my least expected venture, but one I am having the most fun with. Anchor is an easy-to-use podcasting app that I have been using for my show called “Plant Rant Radio”. Anchor allows you to record 5 minute segments, add background tracks, add music from Spotify, call-ins – you can basically do it all! What you’re supposed to do is get all the components together & then stitch them together to create an Episode. This will allow you to make a podcast that is much longer if you only record through Anchor (you can upload from your computer as well). I like the 5-minute segments because it puts a limit on my Rant & forces me to be quicker & more creative on the fly. It’s interesting to see how this has been progressing; I’m feeling more comfortable & getting into a groove. My show has no real direction other than just talking about life – reflecting on the day or just ranting about the stuff bubbling up in my mind. I’m sure I’ll get some “Plant topics” in there eventually, but right now I’m having fun with being myself & being real!

Last year was monumental in the movement & traction I gained with my Passion Projects, 2018 is a year to execute further & take these ideas to new heights.

It seems like just yesterday I was sitting around wondering what my passion was – worried that I would go through life just searching, worried that I was “wasting my life” since I didn’t know what I wanted to do, or had no true passions outside of bodybuilding & fitness. But it doesn’t matter when you find the thing that makes you tick – the only thing that matters is that you know it’s out there & if you’re paying attention, you’ll find your passion & turn your dreams into realities.